Royal Icing Pumpkins – an easy video tutorial for making adorable royal icing pumpkins to dress up fall cupcakes and sweet treats.

This post may contain affiliate links. As an Amazon Associate, I earn from qualifying purchases. Please see my disclosure policy for more on affiliate links and my policies.
I’m not quite sure how it happens every year, but fall always sneaks up on me. One minute it’s still warm out, and the next I’m baking with pumpkin and cinnamon, and wondering how I’m already behind. There never seems to be enough time to share all the fall treats I want to make, but here we are.
Today, I’m sharing a quick recipe and video tutorial for Royal Icing Pumpkins. These adorable little sugar pumpkins are perfect for decorating fall cupcakes and sweet treats. I've become quite fond of making royal icing transfers for my cupcakes, and these are especially fun on pumpkin cupcakes and basically anything that could use a little fall personality.
To make these royal icing pumpkin transfers, you’ll need a batch of royal icing and a few basic decorating supplies. I’m using the same royal icing recipe I use for my Candy Buttons. You’ll also need food coloring to tint your icing. I used AmeriColor Soft Gel Paste for all of my colors.
Royal Icing Pumpkin Table of Contents

My royal icing recipe makes a generous amount of icing for these pumpkins. You can pipe a big batch of pumpkin transfers and still have plenty left over. Extra royal icing is perfect for making Royal Icing Eyes and Royal Icing Carrots. Another option is to visit The Bearfoot Baker; she has a great collection of royal icing transfers.
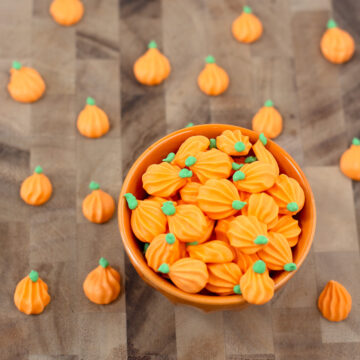
Supplies for Royal Icing Pumpkins
- Royal Icing
- AmeriColor Soft Gel Paste - Orange
- AmeriColor Soft Gel Paste - Leaf Green
- AmeriColor Soft Gel Paste - Mint Green
- Pastry Bags
- Decorating Tip #20, Star Tip
- Decorating Tip #2, Round Tip
Step-by-Step Directions for Royal Icing Pumpkins
Step 1 | The Pumpkin
First, start out by preparing your baking sheets by taping parchment paper or waxed paper to them.
You’ll pipe your Royal Icing Pumpkins onto parchment paper or waxed paper. I taped my paper to a baking sheet for easy mobility. A whole tray of little pumpkins takes up more space than you’d expect.
Using decorating tip #20, apply firm pressure to your piping bag and pull the tip away as the pumpkin forms. Once the pumpkin reaches about ½ inch in length, release pressure and lift the tip away. If a small point forms on top, gently tuck it in with a toothpick.
Step 2 | The Pumpkin Stem
Allow the pumpkin bodies to sit for about 20 minutes before adding the stems. They should be set enough that piping the stem doesn’t distort the pumpkin.
Using decorating tip #2, apply gentle pressure and add a small dollop of green icing for the stem. Release pressure and pull the tip away. Be careful not to press too hard, as the pumpkins won’t be fully dry yet.
Step 3 | Dry + Store
Leave your Royal Icing Pumpkins out to air dry for several hours. They may feel dry on the outside while still soft inside, so avoid handling them too soon.
Once fully dry, store the pumpkins in an airtight container away from light and humidity. If stored properly, they’ll last for years…maybe even forever.
Royal Icing Pumpkin Video Tutorial
What are you going to put your Royal Icing Pumpkins on?
Royal Icing Pumpkins
Ingredients
- 4 cups powdered sugar
- 3 tablespoons meringue powder
- 6 tablespoons water
- ½ teaspoon vanilla extract
- ½ teaspoon almond extract
- AmeriColor Soft Gel Paste or Food Coloring
Instructions
- Prepare baking sheets by taping the parchment paper or waxed paper to them. Set aside.
- In a large bowl using an electric mixer, beat all ingredients together until stiff peaks form; about 10 minutes.
- Divide royal icing into two small bowls, one for each color. Add a drop of orange color to a bowl. Add a drop of leaf green and a drop of mint green to the other bowl. Mix until royal icing is desired colors.
- Pour orange royal icing into the decorating bag with decorating tip #20 for the pumpkin. Apply firm pressure to your decorating bag, pulling the tip away until the pumpkin is formed (about a half-inch in length), release pressure, then pull the tip away.
- Using a toothpick, gently tuck orange points on pumpkins in.
- Allow royal icing pumpkins to dry for about 20 minutes.
- Pour green royal icing into the decorating bag with decorating tip #2 for the stem. Apply firm pressure to the decorating bag, adding a small dollop of green to the pumpkin, release pressure, then pull the tip away.
- Allow Royal Icing Pumpkins to air dry for several hours. Enjoy!


Cass says
Could you possibly do these straight onto the cupcake? Like if I were to use them just as a topper for a quick batch would they still need to harden or would it be ok to put them onto the cupcake and eat them that way?
Sarah says
Hi Cass! You absolutely could pipe these straight onto the cupcake. I would suggest using the same decorating tips, but to use a buttercream instead; that way you don't have to make two different frosting's. You could still pipe them straight onto the cupcake using the royal icing recipe though if you preferred. Thanks!
Dee says
These are adorable!! I wish I'd thought of something like this a few days ago! I threw out a bunch of Royal Icing after realizing it was wayyy too tough to pipe onto 2 dozen Gingerdead Men cookies. This would have saved it and given me cute decorations. You're very creative!
Sarah says
Thanks Dee! Bummer about your royal icing. You'll have to tuck these in your back pocket for next year. 🙂