PEEPS Easter Bunny Sugar Cookies - super adorable, mini PEEPS bunny cutout cookies, decorated with royal icing and colorful sanding sugar; the perfect Easter Bunny cookies for your Easter celebration.

This post may contain affiliate links. As an Amazon Associate, I earn from qualifying purchases. Please see my disclosure policy for more on affiliate links and my policies.
I don't like PEEPS unless you count exploding them in the microwave then I love them.
It’s nothing personal. I think they are super cute and scream EASTER, but I am an EXTREMELY picky eater and I just don’t like marshmallows unless you count them in Rice Krispies Treats then I love them. I also like Lucky Charms marshmallows but are dehydrated marshmallows really marshmallows?
Anyway, I LOVE decorated sugar cookies and PEEPS are totes adorbs so naturally PEEPS Easter Bunny Sugar Cookies we’re going to happen.

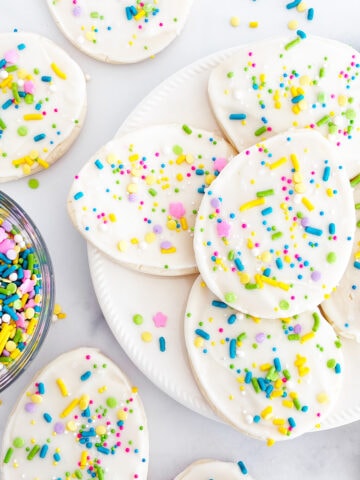
My first crack at PEEPS Cutout Decorated Cookies was way back in 2014. I made them for Easter with my family and was quite happy with how they turned out. I skipped the sanding sugar and just opted for brightly colored royal icing. They were AWESOME!!
They were also HUGE; my PEEPS cookie cutter was 5" in height, and the cookies were LARGE.
Today's version of PEEPS Easter Bunny Sugar Cookies are mini (2") and use this mini PEEPS cookie cutter, which is my FAVORITE. I love making mini desserts; you can just eat more that way. The mini versions are also sporting festive sanding sugar making these PEEPS Bunny Cookies more authentic.
Aren't they the cutest? 😍

PEEPS Easter Bunny Sugar Cookies Directions
Step 1
Using your fav sugar cookie recipe or sugar cookie mix, make your cutout sugar cookie dough. If you're looking for decorated cookie tips, I am a HUGE fan of How to Roll Out Sugar Cookie Dough, How to Cut Out Perfect Sugar Cookies Every Time and Flatten Cookies for a Smooth Decorating Surface.
Using a PEEPS bunny cookie cutter cut out your PEEPS bunny cookies. Bake and allow cookies to cool completely before icing.
Step 2
Make your royal icing. You'll need Electric Pink, Electric Blue, Electric Purple, and Electric Yellow, which should be 8-second icing to both outline and flood. You'll also need Super Black, which should be thicker; you want to pipe the eyes and nose with it.
For outlining and flooding I use disposable pastry bags fitted with PME #2 Round Tip.
Step 3
For the PEEPS Bunny Cookies, outline and flood the cookie in your desired color. Immediately shake coordinating sanding sugar onto the cookie, lift up and shake excess sanding sugar off. Allow sugar cookies to dry completely before piping on the black eyes and nose.
I'd advise against plopping the frosted cookie face down into the sanding sugar - this will mush up and mess your royal icing, rather shake sanding sugar onto the cookie and then shake excess sanding sugar off. So, what I am saying is shake, shake, shake. 🙂

PEEPS Easter Bunny Sugar Cookies are pawsitively earresistible!! 😂 😜

PEEPS Easter Bunny Sugar Cookies
Ingredients
- 1 (17.4-ounce) package Betty Crocker Sugar Cookie Mix ¹
- 1 tablespoon all-purpose flour
- 1 large egg
- ⅓ cup unsalted butter melted
- Royal Icing
- Americolor Soft Gel Paste Electric Colors
- Americolor Soft Gel Paste Super Black
- coordinating sanding sugar
Instructions
- Make sugar cookie dough per sugar cookie mix instructions or using your favorite cutout sugar cookie recipe.
- Roll out the dough. Using a PEEPS bunny cookie cutter, cut about ¼” thick PEEPS bunny cookies. Bake per sugar cookie mix instructions. Allow baked cookies to cool completely.
- Outline and flood cutout sugar cookies with electric pink 8-second royal icing.
- Immediately shake coordinating sanding sugar onto the iced cookie, lift up and shake excess sanding sugar off. Allow cookies to dry completely before adding the black eyes and nose.
- Using a thick black royal icing (you want it to hold its shape) pipe black eyes and noses onto cookies. Allow cookies to dry completely.
- Repeat steps 3-5 with remaining icing colors, electric blue, electric purple, and electric yellow. Allow cookies to dry completely before storing or eating. Eat & Enjoy!


Leave a Comment